Introduction
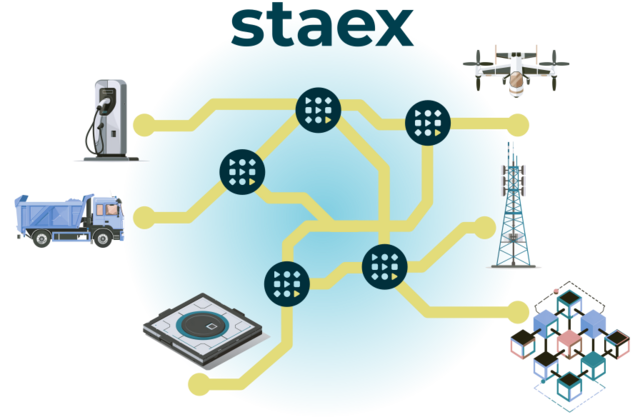
Staex is a VPN for IoT devices that enhances your security with tunnels.
- The network traffic is only allowed to go through tunnels. Any other traffic is blocked.
- Tunnels simplify otherwise obscure configuration of a firewall, DNAT, and port forwarding.
- Each tunnel is encrypted individually and can be disabled without affecting other tunnels.
Staex turns your network into a collection of tunnels radically simplifying network management. Learn more about tunnels…
AI Assistant
Contact us
For any questions or clarifications regarding the documentation, please reach out to us through the contact form available on our website. Our team will be glad to assist you.
Quick start
In this setup you will know how to install an MCC node and a tunnel.
Prerequisites
A Debian or Ubuntu Linux-based system with internet access and UDP enabled. Other distributions are supported, but a different package manager may be required. See here for more details.
Prepare a network certificate
Sign in to your Staex account or create a new one at https://cas.staex.io/. On the New network page of self-service portal create a new network certificate. You will get a private key of your network - save it for further steps. Also copy the network certificate.
Install the node
Install MCC client.
curl -o /tmp/staex-repo.noarch.deb \
  https://packages.staex.io/linux/deb/staex-repo.noarch.deb
sudo apt-get install /tmp/staex-repo.noarch.deb
sudo apt-get update
sudo apt-get install mcc
Now you need to initialize the node with your network certificate. You will be asked for the network certificate and the private key of your network.
sudo mcc init --parents public.staex.io
sudo systemctl enable --now mcc
Check the logs to validate MCC is running:
sudo journalctl -u mcc
Example output would be:
Started mcc.service - Staex VPN daemon.
INFO  [mcc::core::node] node id: gbkjnr7ydpj13bwjf8wcpwkemrnpfch0cfdtsvvgwpedjaa3we70
INFO  [mcc::core::node] trying parent 88.99.68.57:9376
INFO  [mcc::core::node] active parent is 88.99.68.57:9376
INFO  [mcc::crypto::cas_client] network certificate `/etc/mcc/network-certificate.txt` has been updated
INFO  [mcc::crypto::cas_client] network certificate `/etc/mcc/public-network-certificate.txt` has been updated
Setup a tunnel
The public node runs a simple HTTP service. Let's create a tunnel to it.
Here hello is a name of the service, and s12d3qsn3qd0jaaj5rmrxv7rjfyshx9a87ede8455av7xrtmm5tg is an ID of the public
node.
sudo mcc create-tunnel --role client --name hello --remote-node s12d3qsn3qd0jaaj5rmrxv7rjfyshx9a87ede8455av7xrtmm5tg
You will be asked for the private key of your network.
Example output would be:
server endpoint: f1t5y0mkhvw2s8nyrz7xbsa9jgmj0z38c6tr3drexs1wewjwdz0g
client endpoint: scmhygm53q3wkwpy82pnwn4915cth86dhrvy8mrrejtg905dpveg
Use the tunnel
Let's try to resolve a tunnel address by its name:
mcc resolve hello
Example output would be:
10.83.0.2
Now you can use it to access the service:
curl http://hello.staex:8090
What's next?
Explore how to setup two nodes with your own service.
Quick start for two nodes
In this setup you will know how to install MCC nodes and a tunnel.
Prerequisites
A Debian or Ubuntu Linux-based system with internet access and UDP enabled. Other distributions are supported, but a different package manager may be required. See here for more details.
Prepare a network certificate
Sign in to your Staex account or create a new one at https://cas.staex.io/. On the New network page of self-service portal create a new network certificate. You will get a private key of your network - save it for further steps. Also copy the network certificate.
Install the nodes
Install MCC client on both nodes.
curl -o /tmp/staex-repo.noarch.deb \
  https://packages.staex.io/linux/deb/staex-repo.noarch.deb
sudo apt-get install /tmp/staex-repo.noarch.deb
sudo apt-get update
sudo apt-get install mcc
Now you need to initialize nodes with your network certificate. You will be asked for the network certificate and the private key of your network.
sudo mcc init --parents public.staex.io
sudo systemctl enable --now mcc
Check the logs to validate MCC is running:
sudo journalctl -u mcc
Example output would be:
Started mcc.service - Staex VPN daemon.
INFO  [mcc::core::node] node id: gbkjnr7ydpj13bwjf8wcpwkemrnpfch0cfdtsvvgwpedjaa3we70
INFO  [mcc::core::node] trying parent 88.99.68.57:9376
INFO  [mcc::core::node] active parent is 88.99.68.57:9376
INFO  [mcc::crypto::cas_client] network certificate `/etc/mcc/network-certificate.txt` has been updated
INFO  [mcc::crypto::cas_client] network certificate `/etc/mcc/public-network-certificate.txt` has been updated
When both nodes are installed and running, you can proceed with creating a tunnel.
Get the ID of the first node
Go to the first node and run the following command to obtain an ID:
mcc id
Example output would be:
root@mcc1:~# mcc id
gbkjnr7ydpj13bwjf8wcpwkemrnpfch0cfdtsvvgwpedjaa3we70
Install the demo service on the second node and create a tunnel
Go to the second node. We need a service that we will be accessing through a tunnel. Let's use a simple web server running on port 8080. Install Docker if it is not yet there.
docker run --rm -d -p 8080:80 --name mcc-demo-service nginx
Once the web server is running, create a tunnel.
Replace <NODE_1_ID> with the one from the previous step.
You will be asked for the private key of your network.
sudo mcc create-tunnel \
  --targets tcp:8080 \
  --name my-service1 \
  --remote-node <NODE_1_ID>
Use the tunnel
Go to the first node and resolve the tunnel address by its name.
mcc resolve my-service1
Example output would be:
10.83.0.2
Now you can use it to access the service:
curl http://my-service1.staex:8080
You should see nginx welcome page, and the tunnel is working!
What's next?
- Explore MCC DNS service
dig my-service1 @127.0.0.1 -p 8353 +short
dig my-service1.staex @127.0.0.1 -p 8353 +short
- Exlore other nodes of your network
mcc nodes
- Explore how to create tunnels to remote devices
sudo mcc create-tunnel \
  --external-ip-address 192.168.1.1 \
  --targets tcp:8080 \
  --name my-service-remote \
  --remote-node <NODE_1_ID>
Know more about tunnels.
Installation
Please select the relevant platform on the top of this page.
Your first node
In essence, just run sudo mcc init and follow the instructions.
- Sign in to your Staex account or create a new one at https://cas.staex.io/.
- On the New network page of self-service portal create a new network certificate.
- Install MCC by following instructions on Staex repository page.
- Run
sudo mcc init <NETWORK-CERTIFICATE-BASE64>to generate node private key and certificate. Here<NETWORK-CERTIFICATE-BASE64>is the network certificate in BASE64 format that you can copy from the Network page. The command will ask for the network key that you've generated on the previous step. Alternatively follow the instructions on New node page to do the same manually. - Now you're ready to go! Start
mccservice and enjoy your self-hosted, multi-hop network.
# start and enable on boot
sudo systemctl enable --now mcc
# get status
sudo systemctl status mcc
# restart
sudo systemctl restart mcc
# view logs
sudo systemctl -u mcc -e
# start and enable on boot
service mcc enable
service mcc start
# get status
service mcc status
# restart
service mcc restart
# view the last 50 lines of logs
logread -e mcc -l 50
# On OpenWRT you need to run these additional commands
# to configure Dnsmasq to resolve node IDs.
uci set dhcp.@dnsmasq[-1].domainneeded=0
uci set dhcp.@dnsmasq[-1].rebind_protection=0
uci set dhcp.@dnsmasq[-1].confdir=/etc/dnsmasq.d
uci commit dhcp
service dnsmasq restart
service firewall reload
# start
sudo launchctl start io.staex.mcc
# get status
sudo launchctl list io.staex.mcc
# restart (restarts automatically after stopping)
sudo launchctl stop io.staex.mcc
# fully stop
sudo launchctl unload /Library/LaunchDaemons/io.staex.mcc.plist
sudo launchctl stop io.staex.mcc
# view logs
sudo less +G /Library/Logs/mcc.log
# enable on boot
# add <key>RunAtLoad</key><true/> to /Library/LaunchDaemons/io.staex.mcc.plist
Other nodes
Run the following command substituting x.x.x.x with the IP address/DNS name of the first node
and network-certificate-base64 with the network certificate in BASE64 format.
sudo mcc init --parents x.x.x.x <NETWORK-CERTIFICATE-BASE64>
# for public network use
# sudo mcc init --parents public.staex.io <NETWORK-CERTIFICATE-BASE64>
Replace <NETWORK-CERTIFICATE-BASE64> with yours.
Usually a parent node has public IP address but this is not required. You can chain-link nodes to create multi-hop network. Staex ensures global connectivity even if a child node can only "see" its parent but not the other nodes.
Don't forget to open port 9376 for UDP traffic on each node.
If everything went well your new nodes should be visible in the output of the following command on the parent node.
mcc nodes
They will also be visible on Networks page in self-service portal.
How to setup a network of a certain topology?
In this guide we will setup networks of different topologies. Please read quick start guide for installation instructions.
Tree topology

Run the following commands.
# on 10.0.0.2
mcc init --parents public.staex.io network-certificate-base64
# on 10.0.0.3
mcc init --parents public.staex.io network-certificate-base64
Linear topology

Run the following commands.
# on 10.0.0.2
mcc init --parents public.staex.io network-certificate-base64
# on 10.0.0.3
mcc init --parents 10.0.0.2 network-certificate-base64
How to add IP-based devices to network?
Often you want to add an IoT device that speaks IPv4 to your VPN but you can not install VPN on this device. One example of such device is IP camera.
Staex offers tunnels feature that helps solve this problem. Currently this is Linux-only feature.
To connect an IoT device to one of your regular Staex nodes use the following command.
mcc create-tunnel --remote-node NODEID --targets tcp:80 --external-ip-address x.x.x.x
Here x.x.x.x is IPv4 address of the IoT device,
NODEID is the node id of the client endpoint
and tcp:80 is the protocol and port specification.
The command creates necessary configuration files under /etc/mcc/tunnels directory.
The tunnel is activated without the need to restart mcc.
systemctl restart mcc
Now you can verify that the server and client endpoints appeared in the routing table.
mcc nodes
NODE_ID                                               ADDRESS             LAST_SEEN                     PARENT                                                TAGS  TYPE
3zb3xe4gh757dnhdsyrzxxv6efvpgkzg82m08a8w88a5sf48w7x0  x.x.x.x                                           4cc9pkyvvj6accsnc3ac79wy7zstw25cra7ka596tc3a8sg7k5ag        server-endpoint
pvyts5x5rmtv9wkbzvvcr0vbwkmcqqpc7v6b51qc605vcy01b3yg                                                    4cc9pkyvvj6accsnc3ac79wy7zstw25cra7ka596tc3a8sg7k5ag        client-endpoint
4cc9pkyvvj6accsnc3ac79wy7zstw25cra7ka596tc3a8sg7k5ag  y.y.y.y:9376        2023-10-17T10:48:34.485+0200  kd2npmmtvp6p02v7yhgqjdpg58xs9v2sw19k2a8skz4vbdqq1f50
kd2npmmtvp6p02v7yhgqjdpg58xs9v2sw19k2a8skz4vbdqq1f50  y.y.y.y:9376        2023-10-17T10:48:34.485+0200
Here 3zb3xe4gh757dnhdsyrzxxv6efvpgkzg82m08a8w88a5sf48w7x0 is the
node id
of your IoT device.
You can use this id with any command in place of DNS name from any other node in Staex network.
ping 3zb3xe4gh757dnhdsyrzxxv6efvpgkzg82m08a8w88a5sf48w7x0
See also
How to configure built-in DNS?
MCC includes built-in DNS to ease the configuration of human-friendly names for network nodes. Built-in DNS is only able to assign names to node ids and vice versa. There is currently no support for any other DNS records.
To configure a DNS name for a network node
specify
resolver.domain and
dns-names
in the main configuration file like the following.
resolver.domain = .staex
dns-names = node1
Then you can use node1.staex instead of the corresponding node id anywhere.
$ ping node1.staex
PING node1.staex (10.83.0.10): 56 data bytes
64 bytes from 10.83.0.10: icmp_seq=0 ttl=55 time=69.577 ms
64 bytes from 10.83.0.10: icmp_seq=1 ttl=55 time=82.023 ms
...
To assign a name to a tunnel
specify dns-names
in tunnel configuration file
like the following.
dns-names = light1
Then you can use light1.staex instead of the corresponding node id anywhere.
$ ping light1.staex
PING light1.staex (10.83.0.11): 56 data bytes
64 bytes from 10.83.0.11: icmp_seq=0 ttl=55 time=69.577 ms
64 bytes from 10.83.0.11: icmp_seq=1 ttl=55 time=82.023 ms
...
How to configure built-in SSL?
MCC allows us to easily distribute SSL CA certificates across all network nodes. These certificates are installed on each network node as trusted. After that any application can access web sites that use certificates signed by CA like any other trusted web site.
To accomplish this specify ssl-install=true
in the main configuration file
and supply a path to your SSL CA certificate using
ssl-certificates.
After that restart MCC and your certificate(s) will be distributed across all network nodes. Distribution happens incrementally, i.e. if you do not update your certificate, then no updates are sent over the network periodically.
Certificate installation into a trusted store happens via ssl-manage-script.
We provide default script that should work on most of Linux distributions as well as on MacOS.
Please note that recent MacOS interactively request your password via graphical UI to install the certificate in the trusted store.
If certificate installation does not work on your system,
please adjust trusted store paths in the default script under /usr/libexec/mcc-ssl path.
How to configure Dnsmasq for Android clients?
Staex on Android resolves node ids to IP addresses using the parent node. This is due to Android OS not allowing us to run local DNS resolver on the device, leaving us with the option of using the resolver with an external IP address. The parent node hosts such a resolver.
In this how-to we use Dnsmasq as DNS resolver. We use Dnsmasq due to its simple configuration and due to the fact that it is widely available across many Linux distributions.
First we install Dnsmasq using platform's package manager.
apt-get install dnsmasq
dnf install dnsmasq
opkg install dnsmasq
Next we configure Dnsmasq to listen on all addresses on port 53.
# file /etc/dnsmasq.conf
# listen on all addresses
listen-address = 0.0.0.0
# listen on loopback for local name resolution
listen-address = 127.0.0.1
# use MCC to resolve .home.arpa domains
server=/home.arpa/127.0.0.1#8353
# use MCC to resolve DNS names without domains
server=//127.0.0.1#8353
# use MCC to resolve dynamic IP addresses from 10.83.0.0/16 network
server=/83.10.in-addr.arpa./127.0.0.1#8353
Now we enable Dnsmasq to run on boot and restart it to apply the new configuration.
systemctl enable dnsmasq
systemctl restart dnsmasq
service enable dnsmasq
service restart dnsmasq
Done! Now when you specify this server as the parent of the Android device, the device will use Dnsmasq to resolve all DNS names from MCC network and from the Internet. Please continue to IP forwarding how-to to enable Internet browsing for Android clients.
Note. Dnsmasq listening on a public IP is vulnerable to DDoS attacks. How to protect from such attacks is out of scope of this article. Please do your own research before opening port 53 to the public.
See also
How to configure IP forwarding for Android clients?
Staex on Android not only uses the parent node to route the traffic inside MCC network, but also uses it as the default gateway for any other traffic. This tutorial explains how to configure parent node to route the traffic from your Android device to the Internet.
First of all you need to enable IP forwarding on the parent node.
To do that create a file /etc/sysctl.d/01-ip-forward.conf with the following contents.
net.ipv4.ip_forward=1
This file ensures that IP forwarding is enabled on boot. Then enable IP forwarding manually for the running system like this.
sysctl -w net.ipv4.ip_forward=1
The next step is to setup firewall rules that control how the traffic is forwarded between MCC network and the Internet. We will use Iptables to write these rules. First we install the package that enables the rules on boot.
apt-get install iptables-persistent
dnf install iptables-services
Now we add the following rules to /etc/sysconfig/iptables.
*nat
:POSTROUTING ACCEPT [0:0]
-A POSTROUTING -s 10.83.0.0/16 -o eth0 -j MASQUERADE
COMMIT

*filter
:FORWARD DROP [0:0]
-A FORWARD -i mcc0 -o mcc0 -j ACCEPT
-A FORWARD -i mcc0 -o eth0 -j ACCEPT
-A FORWARD -i eth0 -o mcc0 -m state --state RELATED,ESTABLISHED -j ACCEPT
COMMIT
If the file already contains *nat or *filter sections,
add the corresponding rules to the existing sections.
Now use iptables-apply command to test if the rules are working
without locking yourself out of the server.
iptables-apply < /etc/sysconfig/iptables
# use iptables-restore --test < /etc/sysconfig/iptables
# if iptables-apply is not available
Finally enable system service to apply Iptables rules now and restore them on each boot.
systemctl enable --now netfilter-persistent
systemctl enable --now iptables
Done! Now the parent node will forward the traffic from your Android device to the Internet.
See also
How to setup a tunnel between different companies
In this guide we will setup a tunnel between different companies.
Please read quick start guide for installation instructions and how to setup Staex network between two ndoes. This article explain quite the same but the difference is in network certificates exchange betweene different companies.
Let's say first company is Capybara and second company is Steax.
Capybara wants to give an access to their device (node) to Staex.
- Capybara registers in Staex CAS
- Capybara creates new network in CAS
... Staex does same steps ...
- Capybara sends network certificate (public part) to Staex
- Staex sends network certificate (public part) to Capybara
- Bots companies add partner's network certificate to Staex MCC config file. Using this config file field.
- Capybara gets Staex network certificate and creates a tunnel with it.
- So to apply new configuration in the network topology you need to wait for several minutes or restart your node.
- After these steps Staex has an access to Capybara's device.
What is a node id?
A node id is both its address in Staex network and its public key. Such a tight coupling helps prevent man-in-the-middle attacks: spoofing node id amounts to stealing node's private key — something that should not happen under normal circumstances. Node, network and Staex public keys form a chain of trust that is used to verify legitimacy of each node in Staex network.

Node id is presented in the output of many commands as BASE32-encoded string. In this form node id can be used in place of a DNS name in any configuration file and any command that you type in a terminal. Make sure to execute this command from a host that runs Staex.
Use mcc id command to show the current node's id (public key).
Use mcc certificates command to show node and network certificates.
What is a node certificate?
A node certificate is a public key of the node (or a node id as we call it) plus some additional information that is cryptographically signed by a network private key. Node, network and Staex certificates form a chain of trust that is used to verify legitimacy of each node in Staex network.

What is a network certificate?
A network certificate is a public key of the network plus some additional information that is cryptographically signed by Staex private key. A network certificate is used to verify that a node certificate belongs to the corresponding network. To sign the node certificate you need the corresponding network private key. Node, network and Staex certificates form a chain of trust that is used to verify legitimacy of each node in Staex network.

Unless specified otherwise two nodes certificates of which were signed by different network keys can not communicate with each other.
This behavior can be overridden with
trusted-nodes and
trusted-networks settings.
Network certificates are presented in the arguments to many commands as BASE64-encoded strings.
This is the string that mcc init command expects, for example.
Use mcc certificates command to show node and network certificates.
What is a tunnel?

A tunnel is a secure communication channel between two endpoints. There are client and server endpoints. Each endpoint is associated with a unique pair of private and public keys, that are used to encrypt the data sent over the tunnel.
A tunnel defines the list of protocol/port pairs that constrain the communication to the specified protocol and port pairs.
In addition to that server endpoint might be associated with a list of DNS names and a static IP address.
Finally, the server endpoint might be located outside MCC network under local IP address. In this case the traffic is forwarded to this address upon reaching the MCC node where the server endpoint is defined. In this case the traffic is encrypted until the server endpoint, after that it is sent in the original form over the local network.
Microcontroller-based devices that speak IPv4 are good candidates for such external endpoints: IP cameras, network printers and scanners, smart meters, smart light bulbs etc.
See also
What routing algorithm Staex network uses?
Staex network topology is a directed graph. The edge goes from child node to parent node. Each node can be simultaneously a child and a parent.
The node state (e.g. its static IPv4 address, domain name, certificates) propagates from child to parent nodes, and the root of the topology — a node that does not have any parents but can reach any other node via edges — has a copy of each other node's state, i.e. knows everything about the network.
The routing uses Dijkstra algorithm that finds the shortest path between the source and destination nodes of a packet. If the path can not be found by the local node, the packet is sent to the parent node. This repeats until the root node is reached. If the root node can not find the path, then the packet is dropped.
We permit cycles in the graph, however, we encourage to stick to tree-like topologies to optimize node state propagation.
We also permit a node to have multiple parents. In this case only one parent is active at a time. When it goes offline, the child automatically switches to the next parent in the list. This allows the network to gracefully handle root node failures and restarts.
To summarize,
- we support any network topology that is a directed graph,
- we use shortest-path algorithm to find the best route for each packet,
- we have built-in support for root node failures that otherwise would be single point of failures.
Such flexibility allows us to support use cases where some nodes have Internet connectivity, but others do not. The nodes that do not have direct access to the Internet would be able to get it via Staex network. With this multi-hop architecture it is possible to setup networks in hard-to-reach locations: forests, mountains, and even between two islands if there is enough traffic that hosts Staex nodes that work as relays.

StaexWeb
The daemon (staex-web) is responsible for managing MCC.
It is installed on every node in the network.
The default configuration file path is /etc/staex-web.
StaexWeb configuration file
This file is located under /etc/staex-web/staex-web.conf path by default.
To override the path pass the new one as the argument to
staex-web.
log-level = info
Log verbosity level.
Possible values: off, error, warn, info, debug, trace.
password-file = password.txt
Password file that contains hashed password. The path is relative to the configuration directory.
valid-users = staex
Users that are allowed to log in with the password from the password-file.
http-listen = 0.0.0.0:8383
HTTP server listen address and port (ip:port).
static-files-path = /usr/share/staex-web/www
Web root directory.
pre-session-timeout = 1h
Pre-session timeout.
max-pre-sessions = 999
Max. no of pre-sessions.
session-timeout = 1h
Session timeout.
max-sessions = 999
Max. no of sessions.
mcc-config-dir = /etc/mcc
MCC configuration directory.
The same directory should be specified as mccd argument.
mcc-restart-command = systemctl restart mcc
mcc-restart-command = /etc/init.d/mcc restart
mcc-restart-command = launchctl stop io.staex.mcc
MCC restart command. A different command is used by default for each platform.
StaexWeb command line usage (staex-web)
# run the daemon
staex-web path/to/staex-web/config-dir

# print version
staex-web --version

# print default configuration file
staex-web -C
See also
MCC
The daemon (mccd) is responsible for maintaining the overlay network.
It is installed on every node in the network.
The default configuration file path is /etc/mcc.
The client (mcc) is used to interact with the daemon (mccd).
It is installed on every node in the network.
MCC main configuration file
This file is located under /etc/mcc/mcc.conf path by default.
To override the path pass the new one as the argument to
mccd.
listen-addr = 0.0.0.0:9376
Listen address (ip:port).
parents
Parent nodes' socket addresses (ip:port, hostname:port, ...).
parents-resolve-period = 1h
How frequently the parents' hostnames need to be resolved.
resolver.ipv4-network = 10.83.0.0/16
IPv4 network that is used to resolve node IDs. Beware that the addresses from this network are always local to the current node and are assigned dynamically. The same address on different nodes may point to a different node ID. The address is reassigned only if the system runs out of IP addresses, i.e. you resolve over 65536 unique node IDs from a single node.
resolver.ipv6-network = 200::/7
IPv6 network that is used to resolve node IDs. The default is unused IPv6 range deprecated in RFC 4048.
resolver.mac-address-mask = AE:00:00:00:00:00
MAC address mask that is used to resolve node IDs.
resolver.domain = .home.arpa
Domain under which node IDs are resolved.
The default is .home.arpa (RFC 8375).
resolver.ttl = 0
TTL of DNS entries in seconds.
unix-socket-path = /tmp/.mcc-socket
UNIX socket path used by mcc command.
unix-enable = true
Enable UNIX socket server.
Without this server mcc commands do not work.
keep-alive-period = 30s
How frequently the parent node needs to be checked.
topology-update-period = 2m
How frequently topology needs to be sent to the parent node.
rejoin-period = 1m
How frequently a node tries to switch to the first parent.
log-level = info
Log verbosity level.
Possible values: off, error, warn, info, debug, trace.
log-file
Redirect all MCC output to the specified file.
data-dir = /var/lib/mcc
Internal data storage directory.
tun-device-name = mcc0
tun-device-name = utun83
TUN device name (utun83 on MacOS, mcc0 otherwise).
tun-device-mtu = 1280
TUN device MTU.
firewall-chain-name = MCC
Firewall chain name.
dns-addr = 127.0.0.1:8353
Bind address (ip:port) of internal DNS server that is used to resolve node IDs.
dns-enable = true
Enable local DNS server. Without this server node ID resolution does not work on Musl-based Linux distributions and MacOS, but still works on Glibc-based Linux distributions via NSS module.
node-certificate = /etc/mcc/node-certificate.txt
Node's certificate path.
node-private-key = /etc/mcc/node-private-key.txt
Node's private key path.
network-certificates = /etc/mcc/network-certificate.txt
Comma-separated list of files with trusted network certificates.
compression = none
Compression method for tunneled packets.
Possible values: none, lz4.
cert-update-addr = cas.staex.io:8081
The address (ip:port) of a server to get updated certificates from.
cert-update-enable = true
Enable automatic update of network certificates.
cert-update-period = 3h
How frequently to update network certificates.
dns-names
Comma-separated list of DNS names associated with the node.
tunnels = /etc/mcc/tunnels
A directory that contains tunnels configuration files.
dependent-nodes = /etc/mcc/dependent-nodes
tunnels instead.
A directory that contains dependent nodes configuration files.
static-addr = 10.115.0.0/16
Static IP address of this node in overlay network. Please note that dynamic IP addresses is more secure against man-in-the-middle attacks than static ones: dynamic addresses resolve to node ids locally whereas static addresses resolve to node ids by contacting a parent node. This also means that dynamic addresses are much faster to resolve than static ones.
network-lookup-ttl = 64
Network lookup TTL, i.e. the maximum number of hops a packet will travel before being dropped. This applies to static IP address and DNS name resolution.
network-lookup-timeout = 20s
Network lookup timeout. This applies to static IP address and DNS name resolution.
forwarding-rules = /etc/mcc/forwarding-rules.conf
Packet forwarding rules.
forwarding-rules-commit-timeout = 7s
The timeout of applying new forwarding rules with
mcc apply-forwarding-rules
command.
dnsmasq-enable
Enable Dnsmasq integration.
When enabled MCC will generate configuration file for Dnsmasq and
place it under dnsmasq-directory.
The integration is enabled by default if dnsmasq-directory exists.
Note that MCC does not restart Dnsmasq and does not delete generated configuration file.
dnsmasq-directory = /etc/dnsmasq.d
Dnsmasq directory that contains additional (usually per-domain) configuration files.
dnsmasq-restart-command
Dnsmasq restart shell command.
By default MCC does not restart Dnsmasq after the configuration file is generated,
because it may interfere with system boot sequence.
If you are sure that this is not an issue, specify restart command here.
Something like systemctl restart dnsmasq.
exit-node = false
Allow to route the traffic outside MCC network through this node. Use in conjunction with gateway to tunnel all the traffic through MCC network. Disabled by default.
gateway
The node id of the exit-node through which all the traffic generated by/routed through this node will go.
gateway-post-add-hook
Shell script that is executed after the gateway IP rules are added. Use this option to not route the traffic that goes through another VPN through MCC gateway. This is useful when you run multiple VPNs per node.
For example if you have another VPN running on port 1234 the script that makes this port bypass the gateway looks like this.
gateway-post-add-hook = ip rule add sport 1234 lookup main
gateway-post-delete-hook = ip rule del sport 1234 lookup main || true
Please refer to ip-rule documentation to learn what other options do you have.
gateway-post-delete-hook
Shell script that is executed after the gateway IP rules are deleted. Please see gateway-post-add-hook for more information.
kill-switch = false
Disallow to route the traffic via the gateway when MCC is not running.
This option adds blackhole route
that is not removed even if mcc0 device is deleted (i.e. when MCC is restarted).
It is a good idea to test this option when you have physical access to your node,
otherwise it is easy to cut yourself out of the node.
nat-table-expiry = 60s
NAT table entries TTL. Network address translation (NAT) is used to route the traffic in/out of MCC network. You should increase this value only if you experience frequent connection drops.
reroute-dns
Reroute DNS traffic to the specified network node in MCC network specified by node-id:port.
Rerouting is implemented for any packet that goes to port 53.
Use this option in conjunction with Stubby to encrypt your DNS traffic.
reroute-ntp
Reroute NTP traffic to the specified network node in MCC network specified by node-id:port.
Rerouting is implemented for any packet that goes to port 123.
Use this option in conjunction with Chrony to encrypt your NTP traffic.
trusted-nodes
Node ids to/from which it is allowed to send/receive packets. By default only nodes from the same network (i.e. with the same network certificate) are allowed to communicate.
trusted-networks
Network public keys (in BASE64 format) to/from which it is allowed to send/receive packets. By default only nodes from the same network (i.e. with the same network certificate) are allowed to communicate. You can copy network public key from CAS.
ssl-install = false
Add SSL CA certificates obtained via MCC into the local trusted store using ssl-manage-script.
ssl-manage-script
The script that is used to install SSL CA certificates into the local trusted store. The script is called in the following way.
# Add new certificates to the store.
# The certificates are read from stdin as PEM encoded strings, one certificate per line.
# For each certificate the script should output the filename where it was stored.
./script.sh add
# Remove certificates from the store
# The certificates are read from stdin as PEM encoded strings, one certificate per line.
./script.sh remove
# Remove all certificates added by MCC from the store.
./script.sh cleanup
ssl-certificates
Comma-separated list of files with PEM-encoded SSL CA certificates.
ssl-storage-timeout = 24h
How long SSL CA certificates are kept without an update.
ssl-storage-cleanup-period = 1h
How frequently expired SSL CA certificates are cleaned up.
ssl-certificates-ttl = 64
TTL of SSL-related packets, i.e. the maximum number of hops a packet will travel before being dropped.
ssl-update-batch-size = 10
The maximum number of SSL-related messages that are sent in parallel by a parent to its child nodes.
ssl-update-send-period = 30s
How frequently batches of SSL-related messages are sent by a parent to its child nodes.
See also
MCC tunnel configuration file
This file is located in /etc/mcc/tunnels directory by default.
MCC reads all the files with names ending with .conf.
To override the path use
tunnels
property in the
main configuration file.
certificate
Dependent node's certificate path.
Use mcc create-tunnel command to generate a new one.
private-key
Dependent node's private key path.
Use mcc create-tunnel command to generate a new one.
external-ip-address = 0.0.0.0
IPv4 address outside MCC network to which the traffic will be directed. Only addresses from private networks (RFC 1918) are allowed here. 0.0.0.0 means no external address. If this address is specified the packet that reached the server is forwarded to the specified address, and the reply is forwarded back to the client.
dns-names
Comma-separated list of DNS names associated with the server endpoint.
static-addr = 10.115.0.0/16
Static IP address of the server endpoint in overlay network. 10.115.0.0/16 means no static address.
See also
MCC forwarding rules configuration file
This file is located under /etc/mcc/forwarding-rules.conf path by default.
To override the path use
forwarding-rules
property in the
main configuration file.
port from PORT1 to IP:PORT2 protocol PROTOCOL
This rule forwards port PORT1 from the local node to port PORT2 on another node.
IP address must belong to MCC network.
Protocol can be tcp or udp.
See also
MCC daemon command line usage (mccd)
# run the daemon
mccd path/to/mcc/config-dir

# print version
mccd --version

# print default configuration file
mccd -C
See also
MCC client command line usage (mcc)
General options
-s /tmp/.mcc-socket
--unix /tmp/.mcc-socket
--unix /tmp/.mcc-socket
The daemon's UNIX socket path. The client uses this socket to talk to the daemon.
Commands
mcc --help
Print help.
mcc --version
Print MCC version.
mcc id
Get current node's ID.
mcc parent
Get parent node's socket address (ip:port).
mcc health
Get MCC daemon health status. Exit code 0 means success, otherwise failure.
mcc resolve [options] address
Resolve between node IDs, IPv4/IPv6 addresses, and MAC addresses.
-t format
--target-format format
--target-format format
The address format into which you want to resolve node ID.
Possible values: ipv4, ipv6, mac6, node-id. The default is ipv4.
address
The IPv4/IPv6/MAC address or node ID that you want to resolve.
mcc route destination [source]
Get the route to the specified node. The nodes are defined by their IDs.
destination
Destination node ID.
source
Source node ID.
mcc init [options] [network-certificate-base64]
Initialize the current node, i.e. generate node certificate, private key, and setup the parent node if any.
-p
--parents
--parents
Parents node or nodes. Comma-separated list of ip:port or ip items.
--stdin
Read network private key from standard input.
-y
--force
--force
Overwrite existing files without asking.
-C /etc/mcc
--config-dir /etc/mcc
--config-dir /etc/mcc
MCC configuration directory. Default is /etc/mcc
mcc generate-node-certificate [options] [output-directory]
Generate node certificate and private key. This is alternative way of provisioning the nodes that does not require using self-service portal. Easy to automate with IaC tools.
-p /etc/mcc/network-certificate.txt
--parent /etc/mcc/network-certificate.txt
--parent /etc/mcc/network-certificate.txt
Path to your network certificate.
--stdin
Read network private key from standard input.
output-directory
Output directory (default is /etc/mcc).
mcc generate-dependent-node-certificate [options] ipv4-address [output-directory]
mcc create-tunnel instead.
-p /etc/mcc/network-certificate.txt
--parent /etc/mcc/network-certificate.txt
--parent /etc/mcc/network-certificate.txt
Path to your network certificate.
--stdin
Read network private key from standard input.
--dns-names
Comma-separated list of DNS names associated with the node.
--static-address 10.115.0.0/16
Static IP address of this node in overlay network.
ip-address
IPv4 address outside MCC network to which the traffic will be directed. Only addresses from private networks (RFC 1918) are allowed here.
output-directory
Output directory (default is /etc/mcc/dependent-nodes).
mcc create-tunnel [options] --targets targets --remote-node remote-node [output-directory]
Create a network tunnel between two endpoints with unique encryption keys on both sides.
There are client and server endpoints.
The tunnel can only be created on the server side.
Both the client and the server nodes have to trust each other
(see trusted-networks and trusted-nodes).
Currently tunnels support tcp and udp protocols only.
You can assign DNS names and static IP addresses to the tunnels and use their public keys to address specific server endpoints. Please note, the server endpoint can only be addressed from the corresponding client node. On other nodes the endpoint public key will not resolve into a dynamic IP address. This is in contrast to network nodes public keys of which are always resolved into dynamic IP addresses.
-p /etc/mcc/network-certificate.txt
--parent /etc/mcc/network-certificate.txt
--parent /etc/mcc/network-certificate.txt
Path to your network certificate.
--stdin
Read network private key from standard input.
--targets
Comma-separated list of server endpoints specified as protocol:port pairs. Example: tcp:80,udp:2222. Mandatory argument.
--remote-node
Remote node id. Mandatory argument.
--dns-names
Comma-separated list of DNS names associated with the server endpoint.
--static-ip-address 10.115.0.0/16
Static IP address of the server endpoint in overlay network. 10.115.0.0/16 means no static address.
--external-ip-address 0.0.0.0
IPv4 address outside MCC network to which the traffic will be directed. Only addresses from private networks (RFC 1918) are allowed here. 0.0.0.0 means no external address. If this address is specified the packet that reached the server is forwarded to the specified address, and the reply is forwarded back to the client.
output-directory
Output directory (default is /etc/mcc/tunnels).
mcc certificates [configuration-file]
Show the current certificates.
configuration file
Configuration file (default is /etc/mcc/mcc.conf).
mcc nodes [options]
Show known nodes in table or graph format.
-f table
--output-format table
--output-format table
Output format.
Possible values: table, graphviz.
Default is table.
mcc apply-forwarding-rules [options] file
Safely replace existing rules with forwarding rules from the specified file. This command interactively asks for the confirmation after the new rules are applied. If the answer is not received (because your SSH connection dropped), the rules are reverted after a timeout.
mcc help [subcommand]
Print help of the given subcommand.
See also
NSS module usage (libnss_mcc.so.2)
Name Service Switch (NSS) module is used to integrate node IDs and DNS names into the system. The module is supplied for all GNU C library-based Linux distributions (currently all Linux distributions that we support except OpenWRT).
After you install mcc package the module is added to /etc/nsswitch.conf file.
You can check that the module was added correctly with the following command.
grep mcc /etc/nsswitch.conf
The command should output a line similar to the following.
hosts: files mcc [SUCCESS=return] dns
Note the mcc [SUCCESS=return] in the output.
This particular line means that the system first looks DNS name in files (/etc/hosts),
then calls mcc module,
then contacts pre-configured DNS servers (/etc/resolv.conf).
If mcc module returns positive answer, the rest modules are skipped.
Environment variables
NSS module is configured via environment variables. Since the module is loaded to any binary that tries to resolve DNS names, you have to put this variable in the configuration of every daemon that needs DNS name resolution. It is often easier to just use the default values.
MCC_UNIX_SOCKET_PATH
Specify UNIX socket path. Default is /tmp/.mcc-socket.
See also
Tunnels
Unparalleled security isolation level

Tunnels is the flagship Staex feature that aims to simplify network management and aid in implementing EU NIS2 Directive (2023) and recent EU Cyber resilience act (2024). Tunnels isolate individual communication channels to prevent lateral movement in the network If one of the tunnel endpoints is hacked, the tunnel can be deactivated without affecting other endpoints. Tunnels provide more granular isolation compared to VPNs that isolate either network nodes or whole networks but not individual communication channels.
Straightforward zero-trust implementation
Staex implements zero trust through tunnels. Each tunnel specifies a client and a server endpoint, a range of ports and a protocol. The packets are transmitted and received over the network only if they match the specification of one of the tunnels. Both the source and the destination nodes have to define the tunnel for it to function. Any network packet that try to bypass the tunnels is dropped.
In addition to that each tunnel end-to-end encrypts the traffic between the source and the destination network node. Deactivating (revoking the corresponding certificate) the tunnel only affects the traffic that goes through this tunnel, and does not affect the other traffic that goes through the network node. This is the main advantage over node-based security where deactivating a network node also deactivates all the traffic that goes through this node.
Hide real IP addresses of your IoT devices in the field
Tunnels hide real IP addresses of your IoT devices in the field. Applications address tunnels' endpoints by their public keys, and for each public key a dynamic IP address is automatically generated by Staex. This means that real IP addresses of your devices in the field (and thus their geolocation) can not be tracked by malicious actors even if you use Staex public network. This is in contrast to many other VPNs that might expose real IP addresses via NAT hole punching.
Radically simplify network configuration
Tunnels turn your network configuration — including firewall, DNAT and port forwarding — into a collection of tunnel specifications. If a packets matches one of the specifications, it is allowed to flow through the network. Any other network packet is prohibited by default. This greatly simplifies otherwise obscure network configuration.

Make legacy protocols as secure as mTLS
Tunnels upgrade security of legacy protocols which are frequently used in IoT devices (DNS, NTP, RTSP, ModBus, MAVLink2 etc.) to match that of modern protocols like mTLS. All the traffic is end-to-end encrypted, and before sending any packet the mutual trust between endpoints is established using certificates. Tunnels enable secure usage of legacy protocols over the Internet thus enabling use cases that were not possible before (i.e. ever wanted to securely access ModBus data directly from your EV charger?).
Communicate securely through network boundaries
Tunnels pierce through underlying network boundaries. Tunnel source and destination may be located in different local area networks. Staex ensures seamless communication between them. This is possible because Staex provides shared address space for all nodes and does not use network isolation. If a tunnel is defined between any two network nodes, the traffic will flow through this tunnel even if the nodes move from one physical underlying network to another (e.g. roam between telco towers).
Low data usage

We studied several VPNs before releasing the first version of Staex and identified two main sources of excessive data usage in a VPN:
- Idle data usage: When a VPN connection is active, it consumes a small amount of auxiliary traffic even if it stays idle, i.e., no actual user data is being sent.
- Packet overhead: This refers to the amount of service data appended to each packet, and it depends on the routing algorithms, encryption methods, and other VPN peculiarities.
Due to the long history of VPNs, various implementations have emerged. The most up-to-date solutions are more efficient than older ones. Sometimes, older VPNs are challenging to improve because they are already integrated into the kernel, like an IPSec.
Staex v1 was designed from the ground up to minimize data usage. We use differential updates to reduce idle data usage and we use public keys of the nodes as addresses to reduce packet overhead. On top of that we offer an option to compress the traffic between nodes (the graphs on this page do not account for compression).
The highest savings come when sending large number of small messages. Our benchmarks show that for a particular MVNO and for 200 MiB of traffic we can save up to 1.7 EUR per device per month (even without data compression!).

High performance
We did a benchmark to estimate how many nodes Staex can handle. In this benchmark we launched one Staex node on cloud node A and 12k Staex nodes on cloud node B. All of these nodes were connected to the first one. Then we measured memory usage of each cloud node and how much time is needed to bootstrap the network, i.e. to reach fully operational state.

System configuration
- 2 cloud nodes.
- CPU: AMD EPYC (16 cores).
- RAM: 32 GiB.
- Cloud node 1: one Staex node (bootnode).
- Cloud node 2: 12800 Staex nodes (800 nodes per processor core, 12800 Linux processes in total).
Memory usage
- Cloud node 1: 25 MiB
- Cloud node 2: 6 GiB (0.48 MiB per Staex node).
TrustedChain quick start
On this page you can find how to start using our TrustedChain data platoform to see on-chain achored data and certificates.
So to see your telemetry data and certificates in blockchains and our dashboards, you need to prepare data and send it to our platform.
Data reading and preparation
For example you have data from some sensor like temperature or humidity.
Convert value from sensor to integer 64-bit number. At the moment Staex TrustedChain platform accepts only integer 64-bit numbers as telemetry value or string values as base64.
Preparation for hashing and signing
After that you need to prepare data string (byte array) in following format (CSV):
<data_type>,<telemetry_value>,<unix_timestamp_ms>
Or if you have GPS coordinates:
<data_type>,<telemetry_value>,<unix_timestamp_ms>,<lon>,<lat>
where data_type is an unsigned integer 64-bit on your behalf (for ex. 1 - temperature, 2 - humidity), telemetry_value is actual value from previous step (sensor), lan and lon - integer 64-bit.
Hash and signing
Make hash from prepared data string with SHA256 hash function.
Sign prepared hash value with Ed25519 elliptic curve.
If you are already using Staex MCC, you can use it's private key to sign, do not create your own. Usually it is located at: /etc/mcc/node-private-key.txt.
If you are not using Staex MCC, you can create new private key by your own.
Prepare JSON to send
After that you can prepare JSON with following format:
{
  "name": "<your_device_name>",
  "gps": [0, 0],
  "data": {
    "type": 2,
    "value": 123,
    "created_at": <unix_timestamp_ms>
  },
  "public_key": "<ed25519_public_key_base64>",
  "hash": "<hash_base64>",
  "signature": "<ed25519_signature_base64>",
  "api_token": "<trustedchain_api_token>"
}
Send data
Send this JSON payload to our platform through MQTT protocol. Data source name: mqtt://<your_username>:<your_password>@tcmqtt.staex:31982, MQTT topic is telemetry_sync_t.
Please note that tcmqtt.staex is resolved via MCC. You need to follow this guide to install and configure MCC for TrustedChain.
Platform credentials
Right now to obtain MQTT credentials and API token you need to write to Staex team directly and we will send you credentials ASAP.
TrustedChain and MCC integration
The TrustedChain MQTT broker is accessible only within the MCC network. You must run an MCC node to send messages to TrustedChain. Follow the steps below to configure your MCC node.
Install the MCC node
Install the MCC node following the quick start guide.
Share your network certificate
Contact Staex engineers and share your network certificate. Your can find it in CAS on the network page.
Please wait until the confirmation to proceed.
Add TrustedChain network to your MCC node
Create a file containing TrustedChain network certificate:
echo "hEg1B8QjhWbGfHbd1DN7+WngsYhSZ4vJPz9RZWYFmIYD/NouM8UB++gD++gDeqHCzPsmaMK+iA24qlbsLSJQQnG7DBSSLvNxpV8bM6pgcldcqCkmyf/zqsl1wMiEVR7DjqRt8BnMrguO8FyMBA==" | sudo tee /etc/mcc/network-certificate-tc.txt > /dev/null
Edit your MCC node configuration file /etc/mcc/mcc.conf and add the following line:
network-certificates = /etc/mcc/network-certificate.txt, /etc/mcc/network-certificate-tc.txt
Restart the MCC node:
sudo systemctl restart mcc
Create a tunnel to TrustedChain
Preparare your network private key (it was shown to you in CAS during the network creation), and run the following command:
sudo mcc create-tunnel --remote-node twtyk66sdkk4rve3v9rpatgbrrd92715tzvspgg4fpjtg6gb9c90 --role client --name tcmqtt
If the command succeeds, it will print two endpoint IDs like this:
server endpoint: f1t5y0mkhvw2s8nyrz7xbsa9jgmj0z38c6tr3drexs1wewjwdz0g
client endpoint: scmhygm53q3wkwpy82pnwn4915cth86dhrvy8mrrejtg905dpveg
Try to resolve TrustedChain address
Now the tunnel is created, you can try to resolve TrustedChain tcmqtt.staex address:
getent hosts tcmqtt.staex
The command should print an IP address like 10.83.0.5.
You can connect to TrustedChain MQTT broker using internal MCC network.
Troubleshooting
- Verify that the MCC node is running:
sudo systemctl status mcc - Verify that the MCC config contains a parent and a certificate:
parents = public.staex.io
network-certificates = /etc/mcc/network-certificate.txt, /etc/mcc/network-certificate-tc.txt
- Inspect the MCC logs for any errors:
sudo journalctl -u mcc - Contact Staex engineers.
Certification
Explain what a digital certificate is, and how our system works end‑to‑end to create them.
What is a certificate? See example here.
Why you need this
City fleets (buses, trams, service vehicles) face increasing requirements to prove operational and environmental performance. Our system provides verifiable telemetry anchored on a blockchain so any stakeholder can independently check claims.
Key benefits
- Regulatory compliance and audits: Produce tamper‑evident evidence for emissions caps, low‑emission zones, and ESG reporting.
- Subsidies and incentives: Prove CO₂ reductions (or other metrics) to qualify for grants and credit programs.
- Public trust and transparency: Share verifiable facts with city officials and citizens without revealing raw personal data.
- Fleet optimization and maintenance: Confirm data integrity for diagnostics and preventive maintenance analytics.
- Supply‑chain and vendor neutrality: Proofs live on a public ledger, so verification does not depend on trusting Staex.
- Insurance and contracts: Offer strong evidence in performance‑based contracts (e.g., pay‑for‑clean‑miles).
What is a digital certificate?
A digital certificate is a JSON document that summarizes a period of telemetry (e.g., CO₂ readings for one week for Bus #42) and references on‑chain anchors of the underlying raw data. The certificate itself does not need to exist on‑chain; instead it points to the first and last blockchain transactions that anchor the raw telemetry for the certified period. Anyone can recompute the summary from trustworthy data and confirm that nothing was tampered with.
Certificate JSON fields
min,max,avg: Aggregate values over the chosen period.device_name: Human‑readable name (e.g., "bus‑042").device_public_key: Ed25519 public key used by the device to sign telemetry.start_tx_external_id,end_tx_external_id: IDs of the first and last on‑chain transactions that anchor telemetry for the certified interval.user_name: Name of the organization issuing the certificate.created_at: timestamp of issuance.
The raw telemetry is off‑chain in user's database; the hashes and signatures for each data point are on‑chain.
{
    "avg": 10273.33,
    "created_at": "2025-10-21T07:25:22Z",
    "device_name": "mibo67",
    "device_public_key": "b0d41c8fcac6d75a9fb87b6f4537120835b9eb9c9cd30cec49fd1883c13d5f9d",
    "end_tx_explorer": "https://u2uscan.xyz/tx/0x18b892a53f59a5e43a021c94072979b6a86967333fa256836a12098a295186f5",
    "end_tx_external_id": "0x18b892a53f59a5e43a021c94072979b6a86967333fa256836a12098a295186f5",
    "max": 13400,
    "min": 5360,
    "start_tx_explorer": "https://u2uscan.xyz/tx/0xe70d4a073b6f4910c051008a28d11612654c7bbec0b0aea3f71005c58bf91c19",
    "start_tx_external_id": "0xe70d4a073b6f4910c051008a28d11612654c7bbec0b0aea3f71005c58bf91c19",
    "status": "ok",
    "user_name": "Staex"
}
How it works
- Capture: Each vehicle device measures telemetry (e.g., CO₂).
- Hash & sign: For each reading, the device computes a SHA‑256 hash of the payload and signs the payload (or hash) with its Ed25519 private key.
- Anchor on‑chain: We publish a transaction that contains the hash and signature (plus the device public key or a reference to it). This creates an immutable, timestamped anchor.
- Store off‑chain: The full telemetry payload is stored in user's database with a pointer to the on‑chain transaction.
- Certify a period: To prove a vehicle’s performance for a time window, we query the database for that period, compute aggregates (min/max/avg), and include the first and last on‑chain transaction IDs that cover the window.
- Verify: Anyone can fetch the raw telemetry for the same window, recompute hashes, check signatures with the device public key, and confirm that those hashes exist on‑chain between
first_txandlast_tx. If everything matches, the certificate is valid.
Staex v1
This release introduced the new routing algorithm that reduced idle data usage by an order of magnitude. Another change is full rewrite in Rust that brought high performance and low memory usage even on the smallest IoT devices.
Low data usage, low memory usage and high performance are the flagship features of this release. This is the foundation that we build upon to create the most secure VPN for IoT devices.
Staex v2

The major feature of this version would be the introduction of tunnels. Each end of the tunnel has its own private and public key, and each tunnel has a protocol and a port. Staex will prohibit all the traffic outside tunnels. The tunnels is a lightweight replacement for VLANs, IP access/deny lists, user authentication, and network-based isolation in general.
The tunnel does not specify the node on which the application runs, this is determined dynamically. Decoupling applications and network nodes severely limits lateral movement within the network, and enables us to make another step towards ultimate zero trust architecture.
Introduction
The tunnels force network traffic to go through them. Any network packets that try to bypass tunnels are dropped. If no tunnels are defined, no network traffic is allowed.
Why tunnels?
In IoT world the attack vectors that are common for the servers in the cloud are complemented by attack vectors specific to devices as well as physical attack vectors. For example, for a server you can probably get away with using unencrypted DNS protocol— if a man-in-the-middle tampers the returned IP address the actual protocol (HTTPS, SSH etc.) that is used to speak to this server will most likely fail to authenticate. In IoT world even an encrypted DNS packet can actually reveal geographical location of the device that sent this packet which might constitute mission-critical data. This happens because many devices use cellular networks and connect to the Internet through the routers from the nearest cell tower. The same goes not only for DNS packets but for any other packet transmitted by the device. This is the exact reason why IoT devices need another type of security system to protect from the mission-critical data leakage.

One way to solve this mission-critical data leakage is to block any network traffic by default and then selectively establish secure end-to-end encrypted tunnels from clients to servers to protect the traffic. These tunnels differ in their destinations and thus can be divided into regular tunnels, internet tunnels and external tunnels.
Regular tunnels
This type of tunnels is the most common one. They go from clients to specific servers inside Staex overlay network. They use unique pair of encryption keys to encrypt the traffic and to establish mutual trust between the client and the server endpoint. You also have to specify exact protocol and port that a packet should use. If a packet fully matches tunnel specification, it is allowed to be sent and received. Otherwise, the packets is silently dropped. Thanks to unique keys you can selectively deactivate an individual tunnel (prohibit any traffic temporarily) without affecting others.
We consider regular tunnels the main building block of the network.
Internet tunnels
This type of tunnels is used to route all the traffic that goes to the Internet. This traffic goes from the clients in Staex network to the servers on the Internet. As we already mentioned sending this type of traffic directly to the Internet may leak mission-critical information. Internet tunnel prevents that by routing all the traffic (except local networks and Staex traffic itself) through a gateway. A gateway is a node in Staex network that forwards the packet from Staex network to the Internet and sends replies back. With the gateway DNS, NTP and other third-party servers will not see the actual IP address of the device, they will see the address of the gateway.
Internet tunnels work exactly the same as any VPNs that change your geographic location, but Staex gives you full control of both the client and the gateway node, meaning that Staex (as a company) will not see your real IP addresses either.
External tunnels
This type of tunnels is the variation of regular tunnels, but the destination is an IP address from the local network of the server. This means that when the packet reaches the server node it is automatically forwarded to the specified IP address. External tunnels are useful to talk to IoT devices that can not run Staex: IP cameras, smart home appliances, some low-end routers etc. Some IoT networks may contain only such devices, and it is essential for an overlay network to support such use cases.
Conclusion
The newest Staex release blocks network traffic by default and features tunnels as the main building block of your IoT network. Tunnels are versatile:
- regular tunnels route traffic between two endpoints on Staex network,
- internet tunnels route traffic between an endpoint on Staex network and an endpoint on the Internet, and
- external tunnels route traffic between en endpoint on Staex network and a device in the local network (directly attacked to one of the Staex nodes).
Tunnels elevate IoT network security to a whole new level. It is no longer possible for third parties to track geographical location of your devices. In the extreme event of a device breach the damage is contained within the tunnels attached to this device, and deactivating these tunnels will permanently block the spread of the malicious activity within the network. Finally, tunnels unprecedentedly simplify firewall configuration and network management in general for system administrators: when everything is a tunnel it is difficult to make mistake in the configuration.
Stay tuned for more updates! We will soon release a web UI that allows one to securely manage the whole IoT network without the cloud. It has been eye-opening experience to use this UI for our network management, and we can not wait for you to try it yourself.
Introduction
Staex public network is a zero trust network that is the backbone for the todays’ demand of the Internet of Things. In this article we discuss why we are creating such a network and how it can be useful to anyone dealing with IoT devices.
Why public network?
Today IoT devices — IP cameras, smart meters, smart lights, smart sockets, smart fridges, etc. — are made available on the Internet through numerous cloud services, and while this solution currently works (no one can access your devices unless they hack the cloud provider) in many cases cloud does not add any meaningful functionality to what is already available through the device itself using standard protocols like HTTP, RTSP, MQTT.
The reason that we can not use this functionality without a cloud is two-fold: some of these protocols were never designed to work over the Internet and the Internet was never designed as a network for such devices. HTTP (without "S"), RTSP and many other protocols do not use encryption and public key exchange to initiate secure connection, and even if they did, bringing resource-constrained devices to the Internet will expose them to DDoS attacks and make it easy for adversaries to exploit zero-day vulnerabilities in the firmware.
The current solution to this problem (connecting these devices to the cloud) is quite an overkill for implementing secure communication channel. What we really need is the security on the network level so that IoT device vendors would not need to reimplement security for each of their devices. Solving this problem on a network level also improves users' privacy because they no longer need to rely on the cloud providers that often attract hackers by storing user data in one central location.
What is Staex public network?

Staex public network is an Internet overlay that hides real IP addresses of the devices, uses public keys as addresses, and prohibits any traffic by default. Staex provides end-to-end encryption and trust on the network level, and automates making IoT devices a part of the network (port forwarding and DNAT).
Public keys as addresses
Staex uses public keys of the nodes as their addresses. This approach, pioneered by Yggdrasil network, aims to protect from the whole class of address spoofing attacks — the only way to spoof the address is to steal the private key, and the private key never leaves the node.
How do we map public keys to IP addresses? We use public keys as DNS names and resolve them locally on each node to dynamic IP addresses that are used to actually send IP packets.
Hiding real IP addresses
With public keys as addresses it is straightforward to hide the real IP address: if the traffic goes through at least one intermediate node, then there is no way to know the real IP address of the device. To support such a use case Staex implements multi-hop routing: the network has tree-like topology and nodes always use shortest path between each other for the communication.

We accumulate routing tables of all the nodes in the root node. If a node can not find packet's destination in its own routing table, it forwards the packet to its parent until it reaches the root node. This means that the root node knows the topology of the whole network and can actually find the shortest path. This does not mean that the root node is different from others, in fact it runs the same program and makes routing decisions the same way as any other node. So, if you have another intermediate node between the leaf and the root and the destination node can be reached via this node, then the traffic will not reach root node at all. You can read more about the routing in the documentation.
Restricting traffic
Having node keys is not enough for the secure communication, you also need to sign them with network-wide key. Every user has such a key and this key is used to sign node keys and the packets that carry initial public key exchange data. This signature protects the traffic from man-in-the-middle attacks and relieves you from manually adding a list of authorized keys to each node (this is in contrast to how OpenSSH works by default).
Network-wide keys are also used to segment the public network into subnetworks without using the usual prefixes and network masks. By default nodes will not communicate with each other if their keys are signed by different network keys, however, you can override that by adding other network or node keys as trusted.
Conclusion and future plans
Staex public network is a zero-trust network that is the backbone for the today's demand of the Internet of Things. Prohibiting any communication by default and any direct communication in principle is paradoxical for something that we call "a network", however, resource-constrained IoT devices and legacy protocols can not be safely used over the modern Internet. Staex makes certificate-based trust and end-to-end encryption the default for any protocol whether it is legacy or modern.
We plan to update our built-in DNS to work properly in public network (it was designed to work in a network with single owner), and enable endpoint-based security (per-endpoint private keys and trust) with the release of Staex v2.
Introduction
SPN is a decentralized network designed to address the costly and insecure management of DePIN networks, providing efficient execution and enhanced security through its native token, Staex Token (SPNX).
Business problem solved
The current management and services of DePIN networks suffer from inefficiencies and vulnerabilities due to centralized structures and old Internet protocols from the 90s. SPN streamlines network management and enhances security through decentralized architecture and protocols powered by the Staex Token SPNX.
The IT costs of DePIN service creation are very high for businesses and DePIN creators have difficulties making their businesses profitable. In SPN DePIN creators get a secure cost-optimized environment where they can create affordable DePIN applications using the power of their own devices and web3.
The IT fragmentation in DePIN is also very high. DePIN creators end up using multiple solutions from different suppliers which raises the complexity of their operations. With Staex, DePIN creators get everything DePIN integrated into the SPN directly: DePIN connectivity, web3 services, and services.
Technical reasoning
SPN solves the technical challenges of DePIN networks by providing cryptographic certificates for every device, addressing the inefficiencies of batch IP address allocation, and enabling secure remote connections through end-to-end encryption. Staex software acts as a notary, ensuring authenticity and security in device communication via cryptographic certificates.
Every device and every service that runs on the device needs a certificate to ensure secure access to the device/service and prevent lateral movement of the threat actor when device/service is compromised.
IPv4/v6 addresses are sold in batches, and the batches are too big (minimum 256 addresses for IPv4 and 264 for IPv6) to purchase for personal use or even small businesses. Individuals and small businesses have to rely on cloud providers to provide them an IP address for a web site or a service.
As a host you have to configure the IP addresses manually for each device, whereas SPN public keys can be provisioned automatically.
SPN is designed for DePIN devices that can not run a VPN — IP cameras, smart meters, smart lights, smart sockets, smart fridges, etc. — but also runs on regular DePIN devices — routers, servers, single-board computers.
SPN hides real IP addresses of the devices, uses public keys as addresses, and prohibits any traffic by default. This prevents the whole class of IP address spoofing attacks.
SPN allows one to securely share their devices (i.e. allow network access) with selected network nodes. This is in contrast to existing peer-to-peer VPNs that only provide network isolation and in contrast to the Internet that allows access to anyone by default.
Technical benefits of tokenization
High baseline security level. Network participants benefit from security provided to their devices with non-public IP addresses: the real IP address is hidden, DDoS attacks are not possible, the communication is always end-to-end encrypted, and mutual trust is established between endpoints via the cryptographic certificates.
Network governance. Root node owners’ may participate in determining how SPN software and SPN itself evolve.
Short- and long-term value creation
In the short term, SPN facilitates efficient routing of traffic in DePIN networks, provision of certificates, and secure remote connections.
Long-term goals include simplifying access, enhancing connectivity, and enabling machine-to-machine payments.
Cost-efficient and secure DePIN service creation with the possibility to build innovative multi-party business models.
Token economics
SPNX is an utility token that can be used to purchase cryptographic certificates (as NFTs) from a root node to give the buyer the ability to route the traffic via this root node.
Network participants that run root nodes sell cryptographic certificates (as NFTs) as a means for other participants to connect to the root node to route traffic between their nodes that do not have public IP addresses.
Non-binary trust. The trust provided by the certificates is non-binary (this is in contrast to regular trust that is binary) and the level of trust is determined by how many tokens the corresponding root node currently has. The root node that has a lot of tokens may increase the price of their certificates.
Certificate revocation. If a device owner is not satisfied with the service provided by the root node, it may voluntarily revoke the certificate. In this case only the time period during which the certificate was active is billed. This should discourage root nodes from providing subpar service.
Certificate lifecycle. Root node owners issue certificates for at least a month. They will receive tokens for the certificate only when the month passes or the client decides to revoke the certificate earlier. This should discourage root nodes from providing subpar service.
Staking. Both root node owners and regular users have to stake tokens to use the network. The staked amount is returned to them after a predefined time period. This incentivizes honest behavior of the participants in order for them not to decrease the prices of the token.
Incentive for DePIN devices’ owners. SPN provides a higher standard of security compared to the regular Internet. The real IP addresses of the nodes are hidden, DDoS attacks are not possible, the communication is always end-to-end encrypted, and mutual trust is established between endpoints via the cryptographic certificates, the communication between endpoints is only possible if the parties agreed upon creating a tunnel.
Incentive for root nodes’ owners. Root nodes’ owners benefit from selling excess Staex tokens via the cryptocurrency exchanges for profit. Non-binary trust gives root nodes’ owners the incentive to compete with each other and not sell all the excess tokens for profit.
Incentive for Staex. Staex runs its own root nodes and earns money the same way as other root node owners.
Governance. After a certain threshold root node owners’ may participate in SPN governance: determine how SPN software and SPN itself evolve.

Benefits of tokenization
Tokenization streamlines transactions, incentivizes network participation, and enables transparent governance within the ecosystem.
Token metrics
- Initial Supply → tbd
- Launch of SPNX depends on the progress of SPN
- Distribution is as follows.

Stakeholders
Manufacturers: Benefit from streamlined DePIN network management and enhanced security.
Service Providers: Access new revenue streams and opportunities for service provision within SPN.
Developers: Engage in network development and governance, contributing to ecosystem growth.
Regulatory implications
Securities Compliance: Staex GmbH must adhere to securities laws for token offerings representing shares. This involves registration, disclosure, and investor protection.
Crowdfunding Regulations: Compliance with crowdfunding laws is necessary for token sales, including fundraising limits and investor accreditation.
Data Protection: SPN must comply with data protection regulations such as GDPR, ensuring privacy and transparency in data handling.
AML and KYC: Robust AML and KYC procedures are essential to prevent money laundering and verify token purchasers' identities.
Taxation: SPN and token holders are subject to taxation, requiring adequate reporting and compliance mechanisms.
Smart Contract Audits: Smart contracts need security audits to identify and mitigate vulnerabilities.
Jurisdictional Considerations: SPN must navigate regulatory differences across jurisdictions where it operates.
Continuous Compliance: Continuous monitoring and adaptation to regulatory changes are essential for long-term compliance and trust-building.
Technical requirements
The governance structure for the execution of the Staex Public Network would consist of companies that also bring value to the network.
Governing companies must provide computing power to run Staex’s public nodes.
Risks and challenges
Regulatory uncertainties, network scalability, and security vulnerabilities pose risks. Overcoming these challenges requires robust governance, technological innovation, and community engagement.